Welcome to The Nest Eclectic

The Nest Eclectic

Monday, February 28, 2011

Peaches, a taste of summer in the winter!


I don't know what kind of weather you have been having but here in Kansas we had ice, sleet and rain over the weekend, so I thought you might enjoy a little something to remind you of warmer days. Back in June my sister in-law, Tina, and I went out to Pome on the Range, an orchard in Homewood, KS to buy fresh peaches. We each came home with a big box full and prepared them to freeze so we could enjoy a taste of summer all winter long. For those of you who have never tried this you must! You don't have to be a farm woman or an expert cook to tackle this since it doesn't involve canning, and your family will thank you every time you pull a bag out of the freezer.

We chose the sugar pack method.

1. Choose good quality, ripe peaches while in season. In Kansas the peaches are ready in June.
2. Wash and peel the peaches, then slice.
3. Mix 1 T. of Fruit-Fresh and 1 cup of sugar with each quart of sliced 
    fruit, stirring gently so all the peaches get coated.              

   Fruit-Fresh prevents the peaches from turning
   brown and can be found at your local grocery store.


4. Divide the peaches into quart sized freezer bags. I  put in however much I think we will use in one sitting,   usually 2-3 cups.
   
5. Freeze. I lay the packages down in a foil pan to
    freeze, that way they stay corralled and take up less space in the freezer.


6. Thaw in the refrigerator and enjoy. They taste
     fabulous over ice cream!

For more information on canning and freezing you can contact your local extension office. They are a wealth of information on pretty much anything that has to do with the home and garden.


I made a fresh peach pie the day I put the peaches up. Peach is my favorite pie!!!!

I had to get a little fancy with the crust and express my creative side. My good friend, DeLynn, taught me how to make the perfect pie crust several years ago. It is light and flaky and is much better than store bought crust. I will share the recipe with you in a future post.
You will have to put freezing peaches on your list of things to do this summer!
                                                                                                              Jodie

I am joining in on Farmgirl Friday Blog Hop at Deborah Jean's Dandelion House
Farmgirl Friday Blog Hop

Thursday, February 24, 2011

Little Chair Before and After

Hi everyone, I've been busy this week sewing and painting for a show my sister-in-law and I are participating in this upcoming weekend. It is a fundraiser for the football team at Olathe South, where my kids went to high school.  A group of mom's whose sons are players put the show together and there should be about 55 vendors, not bad for the first year. I will have some painted pieces, pillows and the doggie bling collar covers there along with some home decor items. Hopefully there will be a good turn out and even more hopefully people will like my things. I wanted to share the before and after of this cute little chair I did for the show.


I liked the wood and wasn't sure I wanted to paint it at first, but decided to go ahead since it is petite. I thought it would look darling as a desk chair in a little girls room, or as a vanity or accent chair. The seat cushion was in sad shape, I couldn't wait to rip that off!
Here she is after paint, sanding and paste wax.
I chose a cream and tan toile for the seat. I hate when I make something to sell and then start thinking I want to keep it.
I've been making some pillows for the show as well. These pillows are in the cream quilted fabric I used to make the slip covered chair I showed in a previous post.  I took pictures of the pillow process and plan to do a tutorial hopefully next week.
Well I better get going I've got lots more to do. Hold a good thought for me this weekend.
Jodie
I am joining in on Miss Mustard Seed's Furniture Feature Friday

Monday, February 21, 2011

Thrift Store Addiction


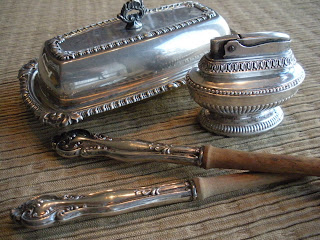
It is sad but I think I am developing an addiction to thrift stores. There are three in the city I live in and two happen to be right across the street from each other which makes it very convenient to just pop in. We have Goodwill, Savers and a Salvation Army. I will be in the car doing errands and will feel this pull to stop in and see if they have anything wonderful. There could be nothing, but then again I tell myself, I might miss something really great. I found some wonderful things on my last visit. I struck gold on silver pieces.

  I am thinking someone probably passed away and their relatives had no interest in silver so they hauled it off to Goodwill. I got all this for $8.00.

 I had never seen silver with a wooden fork and spoon on the ends, I am guessing salad servers. The ends were broken off but I am sure I will come up with something to do with them.
 I fell in love with this little pedestal dish with a handle, so sweet. It will be perfect for displaying a nest, apples, or even Christmas ornaments.
There was even an entire mini collection of baby forks and little spoons.
Well, they all have a new home now and someone to love them.
Have a great day.
Jodie

I am joining in on Show and Tell Friday at Cindy's My Romantic Home
<br><br><br><b>Join us every Friday...</b>

Friday, February 18, 2011

At Last, the Perfect Mirror


Another garage sale score! I found this great mirror at a garage sale in our neighborhood. The people were moving and they had several new mirrors for sale. This one still had a sticker on the front with the designer's name so I don't think they ever even hung it. It is big, 39"x51", and just what I've been searching for. I snagged it for $35.00! Woo Hoo!! My friend said she saw something similar for $160.00.


It has great texture and patina on the embossed metal.


I have been looking for just the right thing to hang over the couch in our living room for awhile now. I did have an interesting two tiered antique shelf there for a long time but when I gave the room a fresh coat of red I wanted something that would make more of a statement. The room has been red for quite some time but I changed the color just a bit. I used Eddie Bauer Cabin Red from Lowe's. It doesn't look as bright in real life as it does in the picture, I need to get a new camera if I am going to keep doing this. I really like the red especially at night, it feels cozy.


I have several antiques in this room and I wanted something more bold with straight lines to mix it up a little.


Now I would like to find one long, or two square ottomans to put in front of the couch. Which do you think?

The couch was a thrift store find that I had recovered, it was a mustard gold in its previous life. I made the pillows and curtains.


       In decorating, one thing always seems to lead to another but that is what keeps it fun!                 

                                                             Jodie
It is party day! Today I am joining in on Cindy's Show and Tell Friday at My Romantic Home and
Miss Mustard Seed's Furniture Feature Friday.
                                                          
     Join us every Friday...
<br><br><br><b>Join us every Friday...</b>Furniture Feature Fridays


Thursday, February 17, 2011

A Favorite Cookie Recipe to Share

This oatmeal cookie recipe is one of my favorites. It is actually a recipe from Crisco but I added my own little twist. It is a yummy moist cookie and always comes out perfect. It is one of the cookie recipes my guys always ask me to make for them to take on their hunting trips, and who knows cookies better than hungry men!

Here is the twist. Instead of using raisins, like the recipe calls for, I substitute dried cranberries. I use 1 Cup and soak them in orange juice for about 20 minutes. Be sure to drain them well before adding to your dough.
I also substituted pecans for the walnuts.
 One tip for making your cookies all the same size is to use an ice cream scoop to measure out the dough.

Chewy Oatmeal Cookies

3/4 cup Butter Flavor Crisco Shortening
1-1/4 cups firmly packed light brown sugar
1 egg
1/3 cup milk
1-1/2 teaspoons vanilla
3 cups quick oats, uncooked
1 cup all-purpose flour
1/2 teaspoon baking soda
1/2 teaspoon salt
1/4 teaspoon cinnamon
1 cup raisins,  I substitute dried cranberries soaked in orange juice, be sure to drain well before adding to the
    dough.
1 cup chopped walnuts,  I substitute pecans

1. Heat oven to 375 degrees F. Grease baking sheets. Place sheets of foil on counter top for cooling cookies.
2. Combine Butter Flavor Crisco, brown sugar, egg, milk, and vanilla in large bowl. Beat at medium speed
    until well blended.
3. Combine oats, flour, baking soda, salt, and cinnamon. Mix into creamed mixture at low speed just until     
    blended. Stir in cranberries and nuts.
4. Drop rounded tablespoons ( I use an ice cream scoop with dough leveled off) of dough onto baking sheet.
5. Bake one baking sheet at a time at 375 degrees for 10-12 minutes, or until lightly browned. Cool 2
    minutes on baking sheet. Remove cookies to foil to cool completely.
Makes about 2-1/2 dozen.

Recipe from Crisco and adapted by me. Enjoy!
                     
                                                              Jodie


Monday, February 14, 2011

Dreaming of Spring and Happy Valentine's Day

We have had snow on the ground for several weeks now and don't get me wrong, I love snow but the gardener in me can't help dreaming of spring. I found these pictures of my hardy hibiscus from last year.
 The flowers are the size of dinner plates and they always make me smile. They are so big they almost don't seem like a real flower. We will finally be getting some warmer days this week so our snow will be melting. Don't know about you, but I am really looking forward to a little sun!
Happy Valentine's Day!
Jodie

Friday, February 11, 2011

Craig's List Buffet

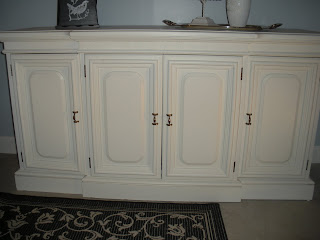
Once I started the laundry room make over I knew exactly the kind of piece I wanted along one of the walls for storage. Usually when I am looking for something specific it can take forever to find it. I have a lot of patience and can wait a long time until I find just the right thing that fits my vision. I don't think that is always a good thing because it tends to drag some projects on way too long. Lucky for me I didn't have to wait this time. I found exactly the piece I had in mind on Craig's List. I think it was born some time in the 70's because it was sporting that tell tale yellow color of that era. It is really heavy and has ton's of great detail. I love detail! I paid $80.00 for it and thought that was a fair price considering it was in great condition and a well made piece.


Notice the bamboo trim on the doors. You just don't see things made like this anymore, that is why I like old furniture so much. Most things back then were heavy duty and made of quality materials. This baby will last forever.


Someone had tried to glaze it with flat paint to tone down the gold and didn't put a finish over it so it wasn't that hard to prepare for painting, except for the all the little details. Now I am cursing the details.


I have a new paint sprayer that I used when I redid our leather couches. Yes, you can refinish leather and now I know how but that is yet another story. Evidently, I didn't get the thing perfectly cleaned out because I couldn't get it to spray right and after an hour and a half messing around with it, I decided to just get out a brush and dig in. I think it turned out pretty cute, what do ya think? Now I am on my way to a fun laundry room!

 I just love to transform things with paint. It is like giving a piece a new lease on life.
                       
                                                           Joyfully,
                                                              Jodie
I am joining two of my favorite blogs, Cindy, over at My Romantic Home for Show and Tell Friday http://myromantichome.blogspot.com/
and Miss Mustard Seed's Furniture Feature Friday http://missmustardseed.blogspot.com/

Tuesday, February 8, 2011

Not So Pretty Laundry Room


Here is my dirty little secret, I have a scary laundry room! When we built our house 16 years ago, a beautiful, state of the art laundry area was not a priority for me. We considered putting a big laundry /sewing room upstairs when we built the house but decided to make the space an office so, the laundry was delegated to the basement. I never thought too much about the space and the way it looked until a few years ago when laundry rooms became showplaces, all fancy and glittery with appliance bling. Our laundry had become a dark dreary catchall. I've thought about fixing it up for awhile but didn't take action until I found the little roadside rescue table that I painted. Who knew a free table would inspire an entire room makeover. Kind of like a $1,000.00 free kitten. But I didn't spend near that much for the redo. Ok, fasten your seat belts here is the scary before.


Open shelves for storing extra canned goods, I like to be prepared. This was a good idea except for the fact the cans get coated with dryer lint, and I have enough dusting as it is.


Ugly yellow wall I painted with some undercoat paint I had left over from a faux finish, hoping to brighten up the space. An old catch- all table and my Halloween birdcage with the crow inside.
Yuck, Yuck, and more yuck. I wanted light, bright and airy.


 My first step was to finish painting the open ceiling white, a project I had started awhile back but never finished. Next I chose a color for the ugly yellow wall. Oddly enough I went with a color called Cloudy Day by Bher but it looked great in the light of the room.


We purchased a pantry cabinet from Lowe's to corral all the canned goods. Now they are safe from dryer lint. We screwed the pantry to the wall and I put up finishing trim around it to make it look built in. Then I added some baseboard.

Here is a sneak peak at the fabulous buffet I found on Craig's List that will go on this wall. I am really excited about it, the piece has so much character. I will post the after pictures of it later in the week.


                                                   Joyfully,
                                                      Jodie


Sunday, February 6, 2011

Keeping It Real


I have a plaque I recieved as a gift that serves as a great reminder to me to find something to enjoy and appreciate in each day. It says, "The time to be happy is now, the place to be happy is here."


Over at  Miss Mustard Seed's blog, she was commenting on the entries in her Copy Me Challenge, how great they looked, and how she felt like she was behind on things she wanted to do with her home due to her business. She seemed worried we thought her home was always perfect and photo op ready. Well I am here to tell you girls if there is one thing I have learned in my 47 years it is that life is messy and nothing is perfect!

When I was in my 20's there were people I was amazed by and a little jealous of because their lives appeared to be so perfect.  Over the years I have come to realize no one's life or home or is always perfect, even though in blog land it might appear to be. The grass isn't always greener on the other side. When we visit someones home we are usually seeing it at its best, all shiny, clean and  picked up. That is what I like to call the "Faux House", that is not real life. Many times before company comes, I make a swing around the house with a big basket and gather all the loose paper and things that are laying around, then stash the basket in the basement. I guess that is one good thing about getting older, you learn the truth about life and start to care less about what other people think.

I really admire Miss Mustard Seed, she is so creative, is great at what she does and is an inspiration to many others. I know she lit a fire under me to create! Thanks Marian, we love what you do.
                                                               Joyfully,
                                                                 Jodie

Thursday, February 3, 2011

Blood, Sweat, and Tears Slipcover


Below is the before of a chair that my sweet sister- in- law gave me for my daughters room. Her room is green with some purple in it but the chair was a little faded and the color of purple was off. So for the second time in my life I decided to make a slipcover. My first attempt at one turned out alright but not exactly what I was hoping for. I did learn a lot from my mistakes on the first chair so I figured what the hey. If at first you don't succeed try, try again!


 Like Miss Mustard Seed, I layed the fabric with the right side facing the chair and then pinned the pieces together. That way you can baste your seems, turn it right side out to check the fit, and make adjustments before stitching. Unlike Miss Mustard Seed, my slipcover did not take a matter of hours but several days working on it here and there. I was getting a little impatient. I'm a pretty good seamstress; even if I do say so myself; and I make curtains, bedding and pillows all the time, but slipcovers are a different animal. It's a project you just have to dive into and give it a shot. I have to admit that a few tears were shed shed at one point out of frustration.
 I used the old cushion cover as a pattern for the new cover. I even ripped out the old zipper and used it. How is that for recycling?

I used a white cotton quilted fabric in a diamond pattern. To clean, all I have to do is take it off and toss it in the wash. I am really happy with this one and now that I've had success, will definitely try it again.
 
If you have a chair you don't love anymore hanging around, I say, "go for it!"    
  Joyfully, Jodie

Today I am joining in on Miss Mustard Seed's Copy Me Challenge
Cindy's Show and Tell Friday at http://myromantichome.blogspot.com/
and http://thriftydecorchick.blogspot.com/ for Before and After Party
Sorry I reposted but I was having trouble figuring out the permalink thing, think I've got it now!