

Many of the blogs I have visited lately have featured beautiful rooms and pillows done in shades of cream. I am usually more of a color girl and have lots of rich, deep colors in my home but after a long, long winter I have been inspired to play with lighter colors. I decided to make a couple of ruffle pillows in some creamy whites, so I dug through my fabric cabinet and came up with these pieces left over from previous projects. I ended up choosing the cream quilted diamond fabric and the taupe and cream diamond print.


We will start with the straight ruffle first. Choose your pillow form and measure the length and width. Add one inch to each measurement, this extra inch will be your seam allowance. I used a 14 X 14 inch pillow so I cut two squares of fabric 15 x15 inches. Set these pieces aside while you make the ruffle.

To determine the length of fabric you will need to make your ruffle, multiply the width of the pillow by 2 1/2. This will make a nice full ruffle. I took 14 inches (width of pillow) x 2.5= a strip of fabric 35 inches long. Now to figure the ruffle width.
I wanted a ruffle that when finished was 2 3/4 inches wide so I cut a strip of fabric 6 and 1/2 inches wide. This will allow for folding in half plus the seam allowance.
So, for the ruffle I cut a strip that was 6 1/2 inches wide and 35 inches long.
I wanted a ruffle that when finished was 2 3/4 inches wide so I cut a strip of fabric 6 and 1/2 inches wide. This will allow for folding in half plus the seam allowance.
So, for the ruffle I cut a strip that was 6 1/2 inches wide and 35 inches long.

To sew the ruffle, fold the right sides together lengthwise and press the fold. Sew the raw edge lengthwise using a 1/2 inch seam allowance. Sew one end leaving the other end open for turning. Turn right side out and press so that you have a long flat tube.


Now you are ready to sew the pillow. Place the front and back of the pillow together with right sides facing each other, sew around the outside of the pillow using a 1/2 inch seam allowance. Leave an opening on one side that is large enough to put your pillow form through. Clip the corners as shown and turn right side out.

Fold the raw edges in toward the inside of the pillow and pin the opening closed. Sew shut by hand.

There you have it. I am loving the cream!
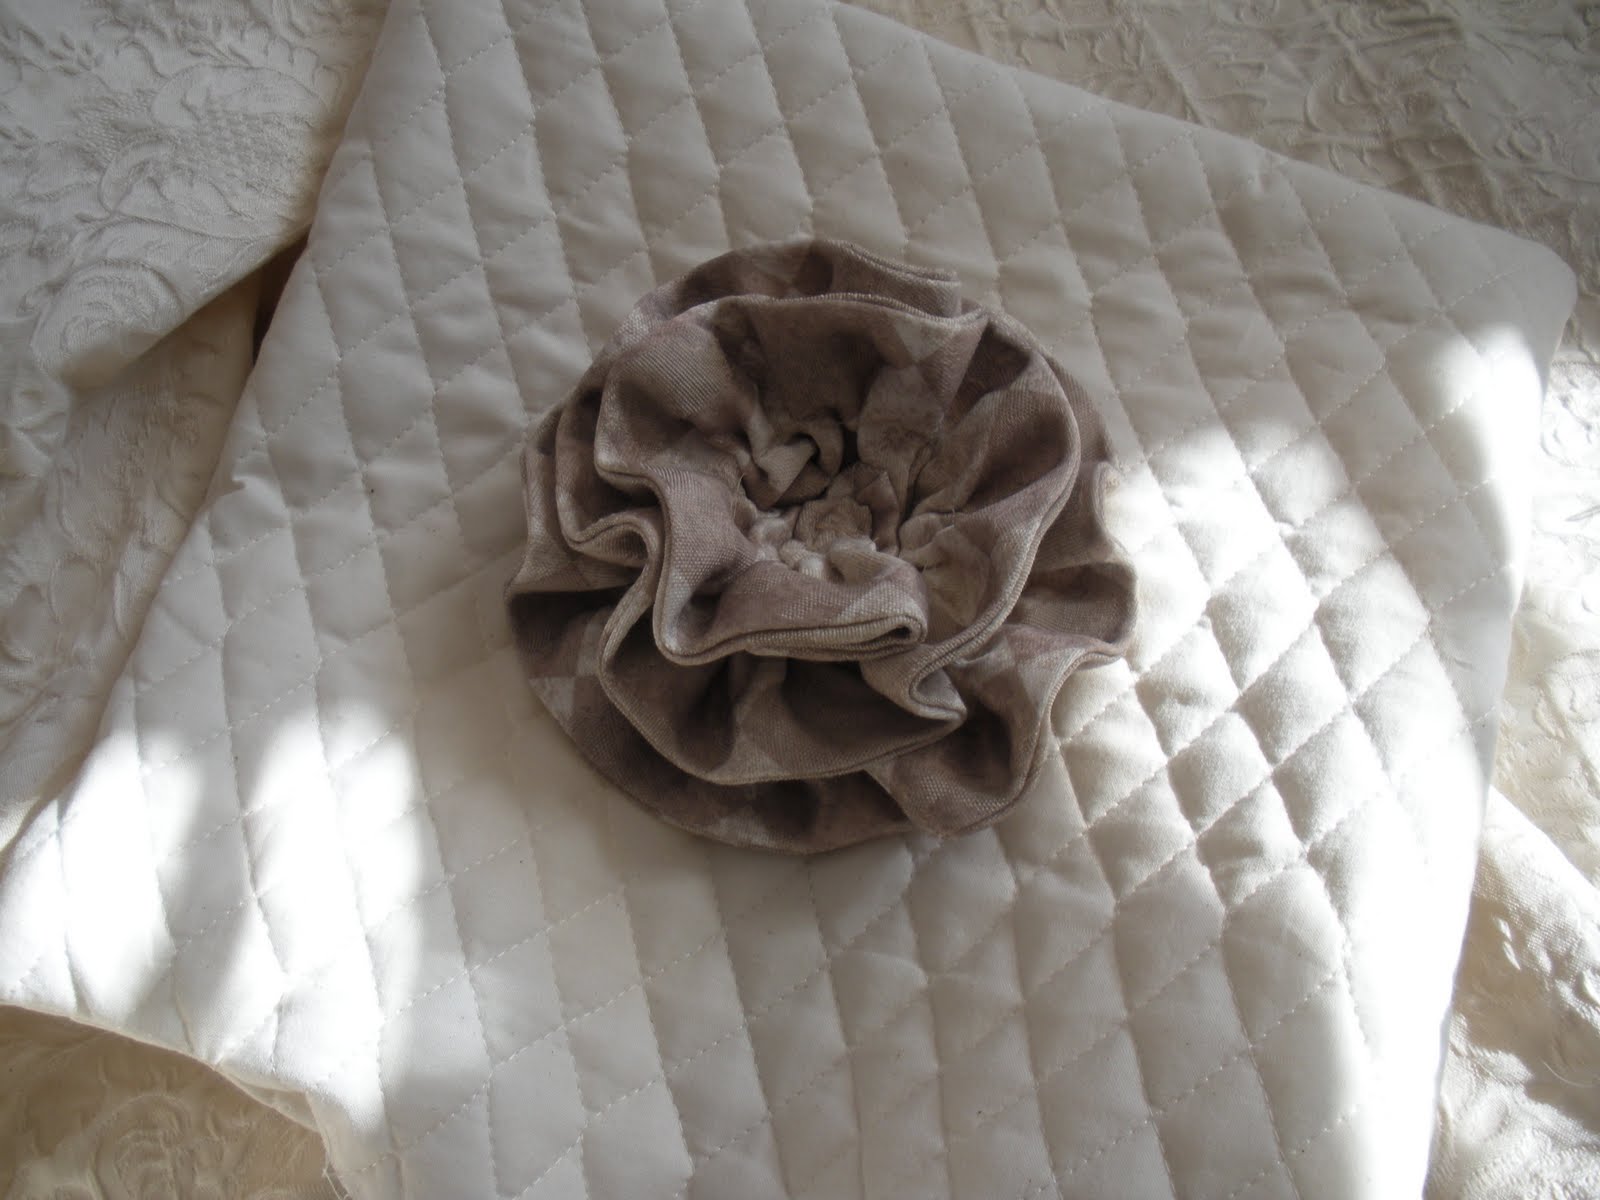
Now I'll show you how to make a flower. Measure, cut and sew the same ruffle as instructed above but once you have turned the tube right side out baste the open end closed by hand. Press flat. This will give you a long tube with no openings. Gather your ruffle as before.
This time, once you have the ruffle gathered, sew right down the middle of the RUFFLE ONLY right over your basting stitches. Do not sew it to the pillow. You will end up with a loose ruffle that looks like this.

Next start shaping your ruffle into a flower. Holding one end start turning the ruffle in a circle around its self

As you form the flower tack it on the back side to hold it together. I like to use Embroidery floss instead of thread for this, it is much stronger than thread. I cut a length of floss and divide out 3 strands to use.

Continue turning and tacking. Be certain to look at the front as you go along to make sure you are getting the look of a flower.

When you reach the end of the ruffle tack the end and knot your floss to secure.

Make your pillow as above sewing right sides together leaving an opening on one side big enough to fit your
pillow form through. Clip the corners and turn right side out.
r
Place your completed flower in the center of the front side of your pillow. Tack in place.

Now you are ready to insert your pillow form and sew the opening closed as with the pillow above.
For a little sparkle I added a vintage broach to mine.

There you have it, one ruffle, two styles!
JodieI'm joining The DIY Showoff Project Parade

I love this idea - the pillow looks beautiful! I found your blog at the DIY Showoff. You have such great ideas and I'm your newest follower! I'd love it if you'd follow me back: http://stillwaterstory.blogspot.com/
ReplyDeleteAgain, you did a fantastic job with this!! :-)
Those turned out beautiful! I really love the brooch on the flower pillow. I can never resist a little sparkle. :)
ReplyDeleteGreat idea. The pillow turned out beautiful,
ReplyDeleteYour pillows turned out so beautifully, Jodie. I really like the neutral colors you found in your stash, they look like a breath of spring.
ReplyDeleteWhat a lovely pillow, perfect for my condo in Philippines. Will surely gonna make it. Thanks for the tutorial! :)
ReplyDelete